Friday 1 March 2013

Thursday 21 February 2013
Sticky Ribs in Under an Hour

Takes: 40 minutes
Feeds: 4
Skill level: Extra Low
The price of beef has sky-rocketed in the UK since we're no longer able to pad it out with delicious horse, so here's a great way to use a cheap-as-chips cut of pork.
- Pack of pork ribs (this one cost me £3 on a 2-for-£6 deal and were at least 2 days out of date when I cooked them)
- 100g hosin sauce (get it in a massive squeezy bottle from the chinese supermarket)
- 1 tbsp any kind of vinegar
- 1tbsp honey
- 2tbsp soy sauce
- 1/2 tbsp mixed spice (if you're American, pumpkin pie spice. If you can get to the chinese supermarket, five spice.)
- Salad or something to make the meal at least look civilised on a plate
 |
| "Streak-free summer glow" |
Method:
 |
| Awwwww yeahhhh |
- Boil the ribs for 15 minutes
Don't bother putting the kettle on, just shove them in a pan with some water and get it hot. Turn it right down once it starts to boil, and keep it on there for 15 minutes. It will smell dreadful and delicious skuzz will float on top. HAVE FAITH. - Prepare the glaze
Shove all the ingredients that aren't pork or salad in a jug and stir them. Proper rocket science, this. Also, turn the grill on the highest setting now - Drain the pork
Look at that grey, sad pork and remind yourself why boiled pork is never the final stage. Put the ribs on a grill tray - Brush the glaze over the porkMakeover time. Make that meat look like an Essex lass in Magaluf.
PS Americans- substitute this for a bad New Jersey joke or something - Grill for 20 minutes
Ribs have an a-side and a b-side. Make sure that fleshy side is up first, and gets nice and charred in places
Yeah, it's really that simple. Go on, do them tomorrow night. If you're having a night in with friends, this will make you godly. Just remember to provide ample napkins if it's for Halo night. That doesn't bear thinking about.
 |
| Not drooling at this image is one of the first indications of vegetarianism. |
Monday 11 February 2013
The Karczma, Birmingham

The place that makes you wish you had a Polish grandmother and hadn't worn a belt.

On a surprisingly snowy February day in Birmingham, I decided to try one of the best-reviewed restaurants about- The Karczma.
The first thing one notices about the Karczma is the homely-yet-touristy decor. An abundance of ikea sheepskins drape over plastic-shaped-like-wood benches (which are fixed to the ground too far from the tables, annoyingly), the ceiling is lined with hay and the walls are painted with twee murals of traditional Polish farm labour. While initially impressive, the juxtaposition of the rustic shutters with the widescreen television silently playing Sky Sports inside it does rather give the impression of a mud hut with mod cons. However, you didn't come here to get gooey over adorable crochet tablecloths, you came here to eat hearty Polish food.
 |
| Do try to look past this vomit-inducing mural |
Once you've ordered, you're told to help yourself to the little table by the bar, which has huge loaves of bread, a pot of pickled gherkins and (most pleasingly), a vat of seasoned pork fat. This really separates the men from the boys- spread that stuff on like peanut butter, it's delicious, and a taster of things to come. If your date shies to this then she might as well go home right now.

I'll just mention now that the wine selection at the Karczma is unsurprisingly poor, since their wide array of flavoured vodkas is the main attraction. Of course, this only clicked into place in the first sip of my warm California Bay Chardonnay from a single-portion bottle: unbeknownst to me, the only wine available by the glass. Just bear that one in mind. Go for beer or vodka.
rest of the meal.
 |
| Adorable soup caddy |
 The dumplings were as heavy and delicious as expected- three beautifully steamed packages that could easily be a small meal each. The goulash soup wasn't too salty, my usual complaint, and was presented in a small hanging cauldron with a tiny wooden ladle. The beef itself was falling apart on my spoon, and had a beautiful sheen from yet more animal fat. The roast pork was particularly good if a little dry in places, with a dark, rich, slightly nutty mushroom sauce and three salads to cut through the heaviness.
The atmosphere at The Karczma is incredibly relaxed. Fortunately,
they opted away from trying to play traditional Polish music, and instead the same three euro-pop tracks spin round. The bar is friendly and inviting, the benches, while uncomfortable, are big enough for at least ten people, but don't feel empty with just two.
 |
| Roast pork with wild mushroom sauce |
Price-wise, you'd struggle to do better. Starters and small meals (like the dumplings) are around five pounds, which larger meals like the pork are around ten. Portion sizes are enormous, so it would be best suited to a group of friends who'd like to share everything, or just popping in for a small soup for an inexpensive, warming meal. The bill came to just over £30 for two, though there was enough food for at least three.
For a restaurant in an unusual location with such an unimpressive front, The Karczma is incredibly well-reviewed. Their Tripadvisor page has endless reviews from happy customers, mainly because they are reminded to on the back of the business card given with the bill, but also because The Karczma presents something of a local secret- homely, different, but budget-friendly enough to frequent.
The Karczma, Polish Millenium House, Bordesley Street, Birmingham, B5 5PH
Friday 21 September 2012
Weekly Bento Roundup
Just three for this week, the others managed to escape before photos!
Note: These photos are dark because they are taken on my phone before going out each morning. Just
squint a bit if it offends you.
squint a bit if it offends you.

(Clockwise from top): Fig baked in brown sugar; Greek yoghurt and honey; raw sugar-snap peas;
raspberries stuffed with blanched almonds; raw red bell pepper; fried chicken with wasabi and
edamame dip as a spread; egg noodle swirls; black sesame seeds

(Clockwise from tomato): Cherry tomato; tomato couscous; raw sugar-snap peas; red grapes;
almonds with the skin on; mini quiche (cheese and onion); 2 orange segments; half a sausage sliced up

(Top to bottom): Three boiled dumplings (chicken and spring onion); three cherry tomatoes; spinach
salad with walnuts; pine nuts and raisins
Monday 17 September 2012
Easy Onigiri (Rice Balls)

Super simple one here, guys. Onigiri are like a sandwich that uses rice instead of bread, and once they're wrapped up you can just take them about in your pocket as a snack or as part of a bento (lunchbox)
Here's a foolproof way to make onigiri:
Ingredients:
- Sushi rice (No other kind of rice. Really, this will just fall apart with anything else. Use what's leftover from making sushi)
- Sushi vinegar
- Nori (the seaweed that goes around sushi- you can even buy this in Tesco these days, but go to an asian supermarket for a better price)
- Salt
- Optional fillings- sesame seeds, umeboshi (pickled plums), tuna mayo, tinned salmon, etc...
Method:
1. Prepare sushi rice
 |
| Filthy filthy gunkwa |
b) Wash the rice with cold water, draining each time the water gets nice and murky. This will stop us ending up with slimy rice. Do it until the water runs clear or you lose the will to live (for me, between 5 and 8 times)
c) Rest the very tip of your finger on the rice. Fill with cold water until the water in the pan reaches the first knuckle of your finger. You'll get to know exactly where is perfect with time, but this is generally pretty accurate
d) Put a (preferably clear) lid on the pan, and put it on the hob on full blast until it boils. From now on, no removing the lid until you're ready to actually do stuff with your rice
 e) Once it boils, turn the hob down to its lowest setting for 10 minutes until the water has completely absorbed
f) Take it off the heat and put to one side for between 5 and 35 minutes to steam off the bottom. DO NOT REMOVE THE LID UNLESS YOU WANT TO DESTROY EVERYTHING. Prepare your fillings now.
g) When you're ready to go, lift the lid and add two tablespoons (or a slosh) of sushi vinegar, and stir your rice around
2. Prepare for action
a) Get out two little bowls. In one, put water and as much salt as will dissolve. This is your handwashing station to stop the rice from sticking to your fingers
b) Rip a nice big sheet of cling film off. Then cut it in half to make a decent sized square and lay it in the other little bowl
c) Sprinkle a little salt on the clingfilm to stop the rice from sticking to it
d) Dip your hands in the salt water solution if you're going to use your fingers to transfer rice from pan to bowl (do this between every rice ball)
3. Make Onigiri
a) We're going to use half a cup of cooked rice for each rice ball. Put this amount aside if you need to, or just guess. Put two thirds of it in the clingfilm bowl

b) If you're going to add a filling, poke a little dent and add a teaspoon of it now
c) Put the last third of rice on top
d) Gather the cling film edges and squish the ball further into the clingfilm (like you're squeezing cottage cheese through the bottom of a sock) in order to get the airbubbles out of the rice ball (bad analogy? Nah, you get the picture)


e) With one hand flat, and one bent at 90 degrees where the fingers join, squish the ball into a rounded triangle. Use your thumb and little finger to flatten the sides. Rotate and repeat.
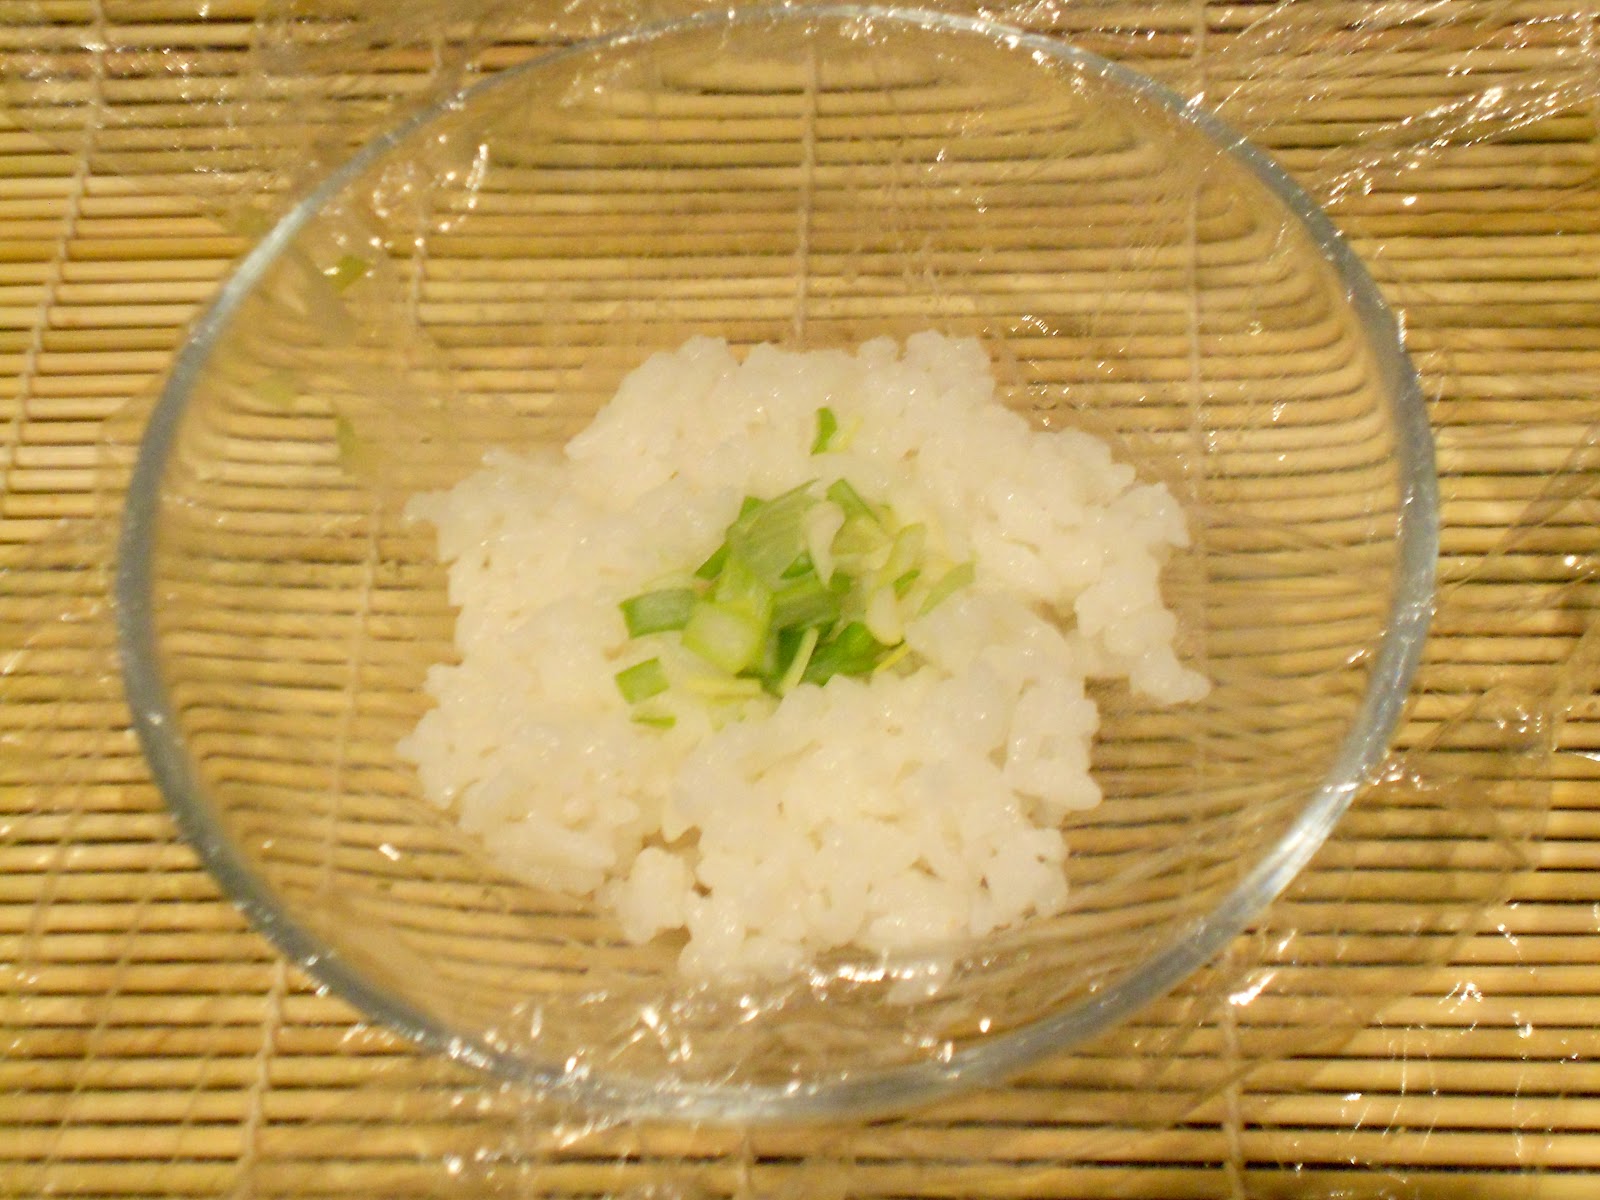
 |
| Happy little onigiri seemingly from the 90s |
 |
| Mixing in sesame seeds makes it look adorable |
f) Cut a strip of nori and wrap around the bottom as a handle
|
| Black sesame seed onigiri on grilled asparagus and sliced bell pepper, with feta, asparagus, sweet chilli and bell pepper salad. With more sesame seeds, because then they MATCH. |
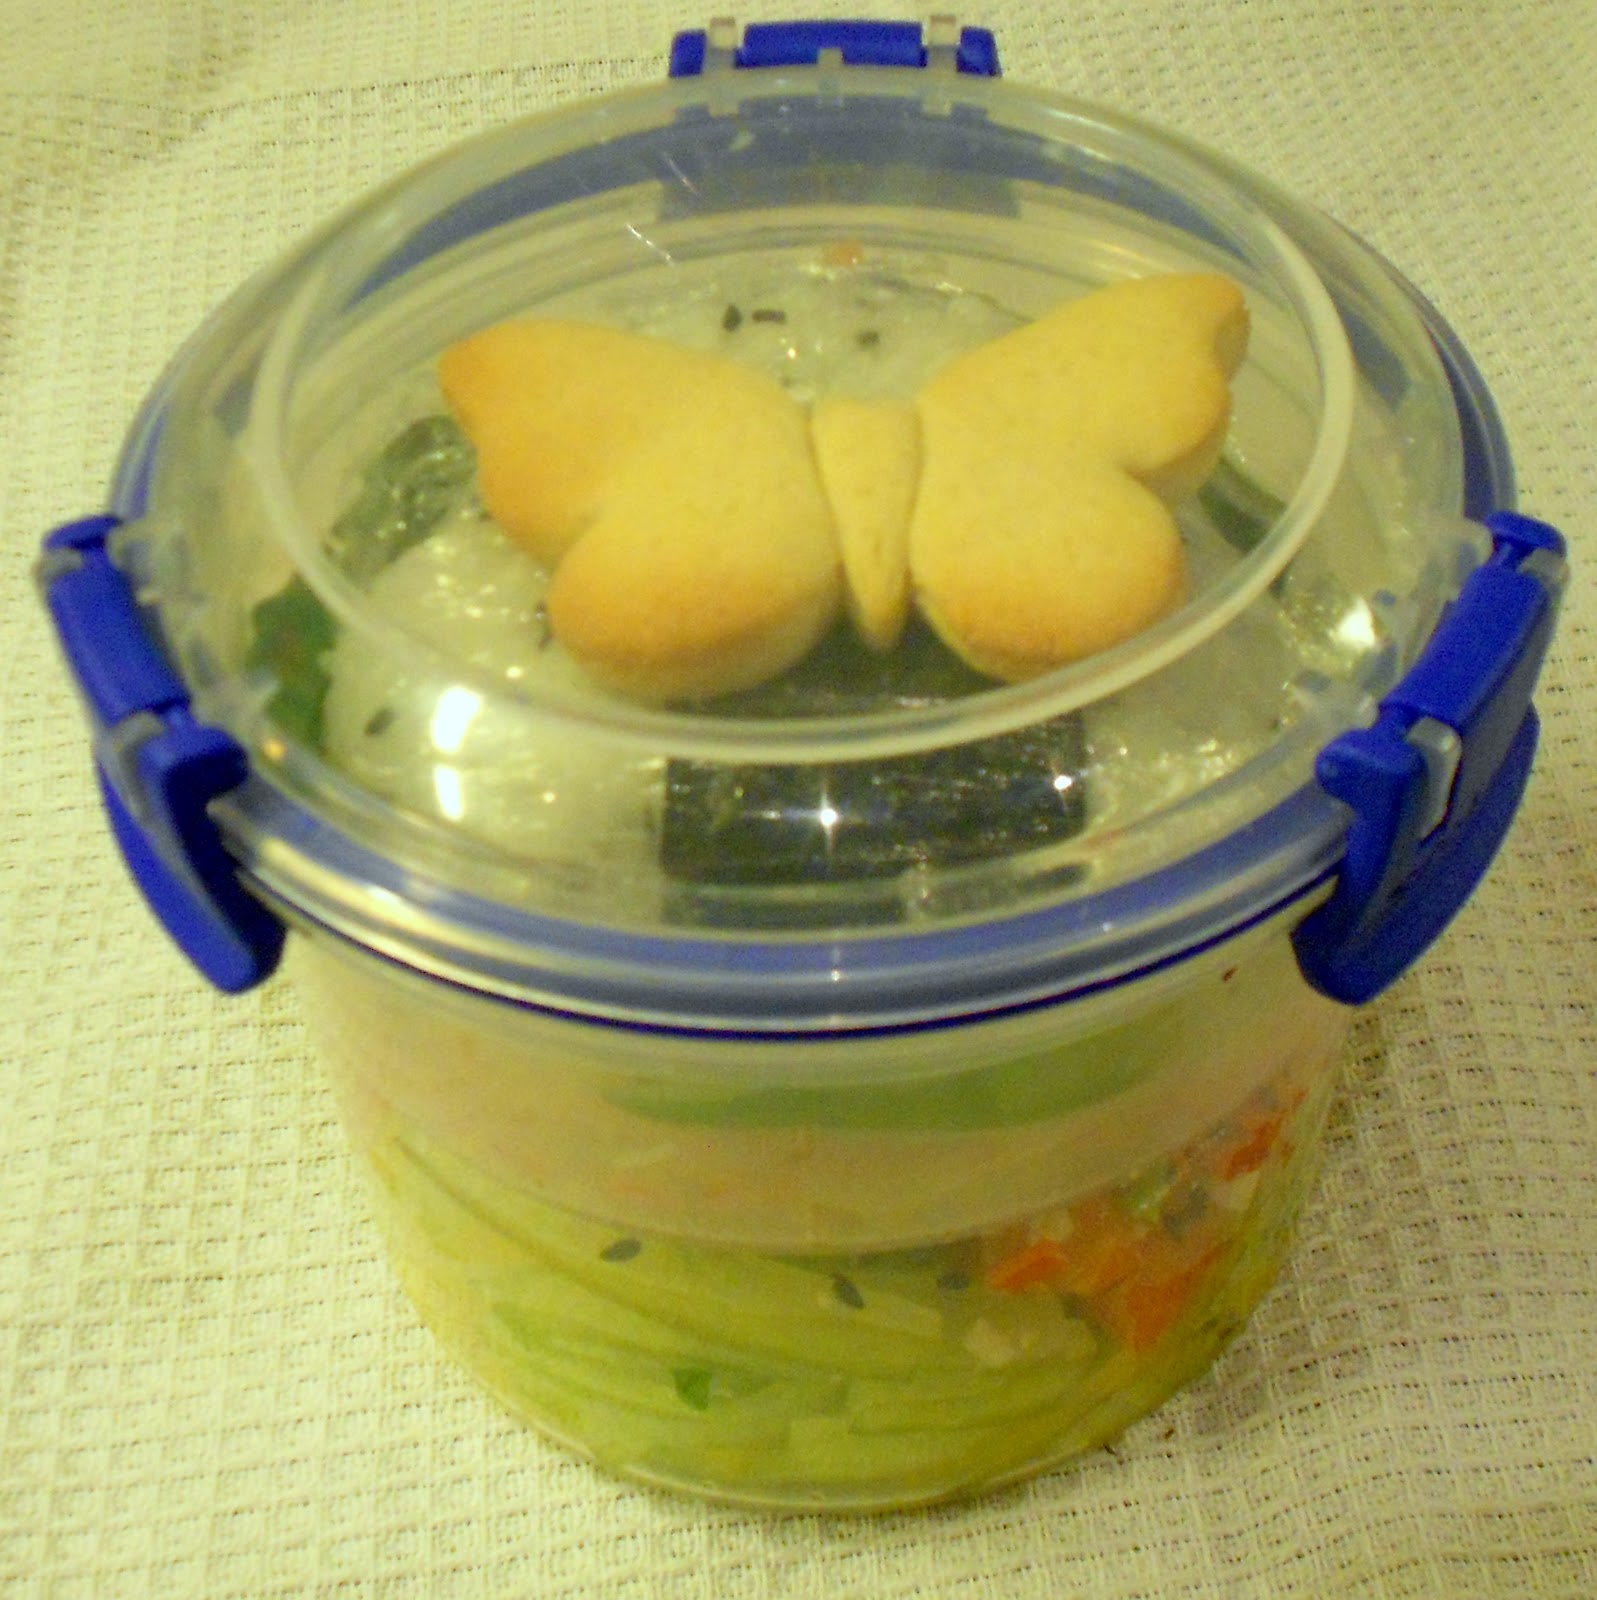 |
| All packed up and ready to go. Plus a silly butterfly cookie |
Monday 27 August 2012
Foolproof Sushi (Maki)

Takes: 45 mins, mainly passive
Multitasking level: Very low
Feeds: 1 person per full roll (6 maki pieces)
The important thing to note in my Potted History of Sushi in the UK* is that ladies love sushi, and in particular Maki (just meaning "roll"), which are the bite sized ones that come in servings of six. If you have to bring food to a party and you bring sushi, I can guarantee you'll be beating the women away with a stick, because it seems a lot harder than it really is and is quick to make in huge quantities.
(I'm just going to add here that since making this tutorial, I have become better at both sushi, food photography and half moon manicures, so these pictures might be replaced with some that I can bear to look at a little more soon.)
Ingredients:
These will be available in Asian supermarkets, online, or for extortionate prices in regular supermarkets.
- Sushi rice - This is a special short grain rice that sticks together well without forming rock hard clumps. Don't let me catch you trying to just overcook Jasmine or American Long Grain. I will catch you because you will be crying over your terrible attempt at sushi
- Sushi vinegar- This is what makes it sushi. Sushi roughly translates as "sour rice"
- Nori- Available in packs of about 6 sheets for three quid in Tesco or about 2 quid for a hefty block in an Asian supermarket. It's really about how willing you are to be slightly terrified by jars of hot chilli fermented bean curd
- Fillings- We're going to use cucumber mainly here, but avocado, bell peppers etc are also good. Do not put raw fish in it unless it's Sashimi quality (that means it's been flash-frozen to kill off bacteria) and don't use smoked salmon because it's way too strong a flavour
 |
| Ok, you know what I said about having got better at sushi? These things are too fat. Get that yellow pepper size zero if you're going to use it- this sushi is a cruel land for curvy veg |
Method:
1. Prepare sushi rice
|
| Filthy starch trying to sabotage your sushi |
b) Wash the rice with cold water, draining each time the water gets nice and murky. This will stop us ending up with slimy rice. Do it until the water runs clear or you lose the will to live (for me, between 5 and 8 times)
c) Rest the very tip of your finger on the rice. Fill with cold water until the water in the pan reaches the first knuckle of your finger. You'll get to know exactly where is perfect with time, but this is generally pretty accurate
d) Put a (preferably clear) lid on the pan, and put it on the hob on full blast until it boils. From now on, no removing the lid until you're ready to actually do stuff with your rice
e) Once it boils, turn the hob down to its lowest setting for 10 minutes until the water has completely absorbedf) Take it off the heat and put to one side for between 5 and 35 minutes to steam off the bottom. DO NOT REMOVE THE LID UNLESS YOU WANT TO DESTROY EVERYTHING. Prepare your fillings now.
g) When you're ready to go, lift the lid and add two tablespoons (or a slosh) of sushi vinegar, and stir your rice around
 |
| Apple corer and speed peeler make preparation an adventure and an ego boost |
2. Prepare fillings
a) Chop up everything that's going in into lovely long, thin strips
b) Get a tiny bowl out and fill it with water and some salt. You're going to use this to stop the rice sticking to your hands
c) Admire how organised your little sushi station looks
3. Make Maki
a) Lay out half a sheet of nori on your sushi mat
 |
| Ripped nori is hella butch |
c) Lay a sparse line of filling on the side closest to you
d) Using the mat to help you, roll the first tiny bit on top of itself to make a solid starting point. Now carefully roll it away from you, keeping it tight without ripping the nori. Press in the middle to ever so slightly squish the mix out to the sides. This might take a bit of practice, so be ready to eat your first (delicious) failed attempt
Look, this bit's fiddly, so I'm just going to go ahead and give a picture sequence
 |
| FILL 'ER UP |
 |
| This is no place for Bachelor Frog levels of cleanliness |
 |
| Keep it tight |
 |
| See how useful it is to have pictures? |
 |
| Squishy squishy! Distribute even pressure to avoid sushi roll beer gut, and try not to split your nori |
 |
| Just remember I told you I'm better now. |
4. Slice up and serve
 |
| This picture was cropped to hell, so now it looks like we're making sushi IN THE NINETIES |
b) Arrange on a plate, possibly add other fun sushi bits such as a little dish of soy sauce or (my favourite) pickled ginger. As we've mentioned before, soy sauce quality does matter, but wasabi... Well. In this country, wasabi is green coloured horseradish sauce. Real wasabi is grated and mixed into a paste at the table, and loses its flavour in about 10 minutes, so don't lose sleep over not being able to impress your lady-friend with high quality stuff at this stage

Chow down.
NB: These refrigerate well, but not for days and days. Rice goes hard once compressed, and even harder when compressed and cold. Try to avoid terrifying rice pellets of tasteless doom.
Got leftover sushi rice? OM NOM. Get over to my Onigiri tutorial and learn how to make that delicious before it turns into a gelatinous lump in your pan.
* A potted history of sushi in the UK
Sushi came into public consciousness in the UK in the 80s through American classics such as the Breakfast Club ('85) but also through Japan becoming a hideously fashionable place due to its expanding tech economy. It was food for "yuppies" and was laughed at throughout the nineties when every curry-and-chips loving Briton happily declared how they could never eat raw fish because that was disgusting. Sushi grew in mainstream popularity throughout the early noughties, and its current availability in supermarkets has promoted a search for "authentic" sushi for hipsters, as Britons come to reject classics such as "Chicken Mayo Californian Rolls" available in the Tesco Meal Deal range. Sushi is a bit of a cult classic in the west, but mainly among women as it poses a "light" alternative to a sandwich (while still being almost entirely rice), and is the only recognisable representation of Japanese cuisine in the UK, as most Britons harbour no desire for anything that's been purposefully left to rot before eating.
Tuesday 22 May 2012
Wontons and Mini Quiche

Alright! Today we're making wontons (or Jiǎozi as they're properly known. Actually what we're cooking are Gyōza, the Japanese version, because we're using garlic and such, but the wrappers should be thinner if we're going Japenese authentic. I get geeky about this stuff. Let's just call them wontons.) and using the leftover gunk to make mini quiches, the best kind of quiches.
Wonton preparation takes a while, so be sure to make an absolutely massive batch. Use the wontons in soups (boiled ones only) salads, lunch boxes over rice and for dipping in soy sauce or sweet chilli sauce.
Ingredients:
 |
| Happy little package of convenience! |
- Three turkey breasts (or equivalent in just about any light meat)
- Three spring onions
- A cup of chopped bacon bits or cured ham if you're fancy (to counteract the healthy blandness of the turkey)
- One tablespoon oyster sauce
- 1tsp crushed garlic
- 1 tsp crushed (and chopped) chilli
- Wonton wrappers from the local asian supermarket
- Look, I know you can make your own. I've done it. But these ones come in a lovely little packet and don't make a mess. If you really want to, it's just flour (preferably rice flour) and water. Go wild.
- 2 eggs (one for the mixture, one for sealing the wontons)
Extra ingredients for the quiche:
- Plain flour
- Some kind of butter, stork or (at a push) animal fat
- Another egg. I sure do love cholesterol in my cooking
Method:
- Prepare wonton filling
- Cut the meat like it owes you money. Seriously, as finely as you possibly can. It should look disgracefully not-meat-like by the end. If you have big lumps, they will make your wontons burst while cooking, and then that mix will stick to other wontons so even the successful wontons will remind you of your past failures
- Chop the spring onions finely and add to the bowl, season with salt and pepper
- Add 2 teaspoons of crushed garlic and 2 of crushed chilli, according to taste, and 1 tablespoon of oyster sauce. If you don't have oyster sauce, mix a tablespoon of soy sauce with a pinch of sugar and enough cornstarch to form the consistency of tomato ketchup, and add that
- Wontons, Assemble!
- Assemble in batches. Put a teaspoon of filling in the middle of the wonton wrapper
- Beat an egg in a seperate dish and smear it around the outside with your finger while trying to take pictures/use a pastry brush like a responsible adult
- Fold in half and crimp the edges. Here are three pictures of valid ways of crimping the edges. The one with the fork most shouts "White girl cooking Chinese food" so that's what I generally go with. Also it reminds me of delicious pies

Words can't bring them down, oh no no. - Cook wontons
- Fill a kettle with boiling water and add a splash of soy sauce to help with flavour
- Lower wontons in carefully with a slotted spoon
- Boil them until the last wonton has risen to the top of the pan (Protip: Lay a wooden spoon over the pan to stop thing accidentally boiling over. If you work on gas, make sure to line it up with the handle of your pan or you'll burn it and everyone will laugh at your foolish error)
- Drain in a colander

 |
| Prussian Efficiency |


 |
| This is how I like my wontons: Pure and delicious, almost healthy |
 |
| This is how my little sister likes hers. All you have to do is pan fry after boiling- gives them a nice crispy skin, for easier dipping |

Great! You've got wontons! And a whole bowl of wonton mixture left over! Fortunately, wonton mixture is basically the same as quiche mixture. If you're very foreign and don't know what a quiche is, it's an omelette pie. Am I making this sound glamorous? Quiche is manly, let's go.
Preheat the oven to 190C (374F), add the rest of the egg you used to seal the wontons to the bowl of slop and quickly knock up some short crust pastry:
 |
| Rolling pins are for losers (this recipe only) |
- Guesstimate the volume of pastry you want and put about half as much flour as that in a bowl. It's better to be over than under. Also add a generous pinch of cayenne pepper- this makes cracking pastry
- Add half as much fat as there is flour (stork or butter is best-- steer clear of anything that claims to be healthy) and rub in with your fingertips until it looks like breadcrumbs
- Crack and egg in and form into a ball with your hands. Sloppy? Add more flour until it resembles what you think pastry looks like
Spray your muffin tin with oil spray (or grease with butter and some kitchen towel). Now rip the pastry into balls, flatten with your fingers and line the muffin tin with them
Slop the mixture in each one, sprinkle grated cheddar delicately on top and whack them in the oven until the cheese starts going brown where it's spilled over on the muffin tin. Also it should smell like Cheese On Toast (Americans, I believe you have something called a "grilled cheese". Use that as guidance)
Cool on a cooling rack and chow down.
NB: Both these things are amazing in bentos (lunchboxes). The quiches can be just wrapped up in tin foil and eaten as a hearty mid-morning snack. Go crazy.
Slop the mixture in each one, sprinkle grated cheddar delicately on top and whack them in the oven until the cheese starts going brown where it's spilled over on the muffin tin. Also it should smell like Cheese On Toast (Americans, I believe you have something called a "grilled cheese". Use that as guidance)
 |
| Smells like the dishonour of a filthy muffin tin |
 |
| Smells like the glory that is Cheese On Toast |
Cool on a cooling rack and chow down.
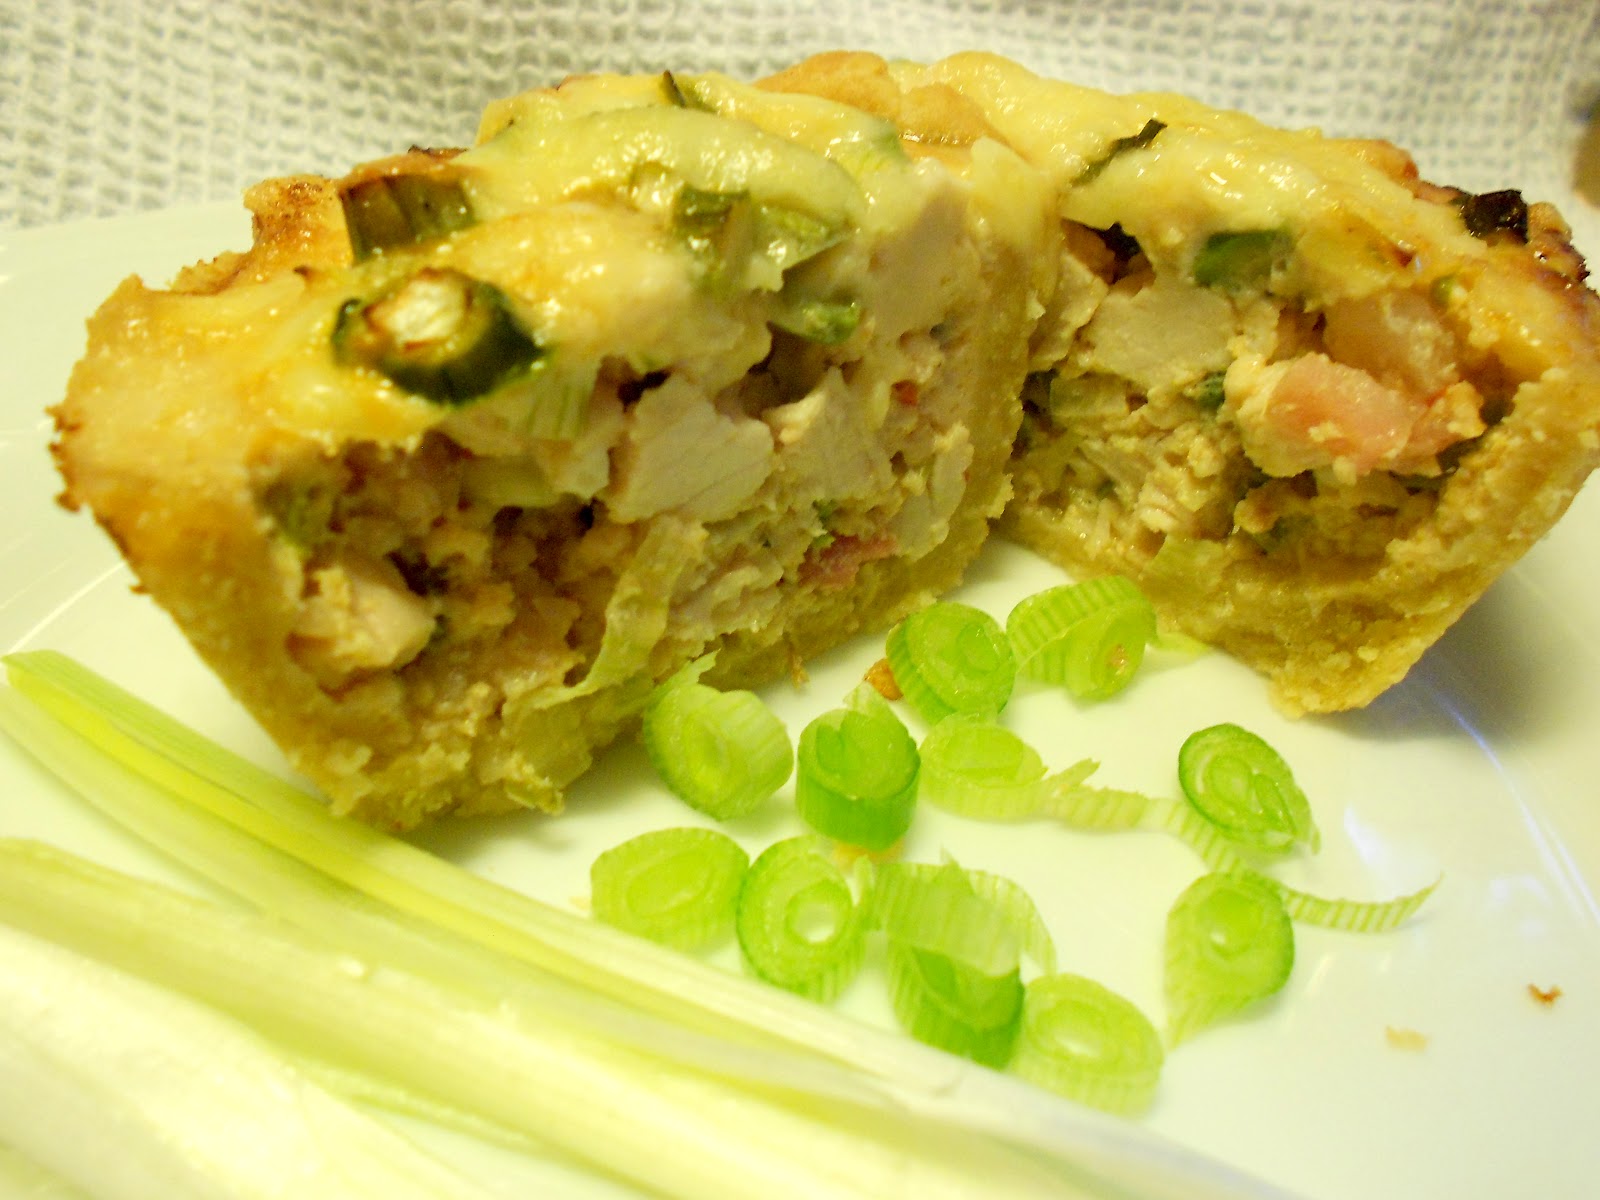 |
| Quiche just doesn't look good in photos. Trust me that this is delicious. I think it's the arbitrary bits of spring onion that really make it sparkle. |
Subscribe to:
Posts (Atom)